A battery current sensor monitors the electrical current flowing into and out of your vehicle’s battery.
In modern cars, it feeds real-time data to the ECU, BCM, or battery management system (BMS), which then decides how to charge the battery, manage electrical loads, support start-stop systems, and protect the battery from overcharging or deep discharge.
In this guide, we’ll cover what a battery current sensor does, what happens when it goes bad, how to test it, whether it can be reset, and why bypassing it is a bad idea — in plain, practical terms.
What Is a Battery Current Sensor?
A battery current sensor is an electronic device that measures the flow of current into and out of the battery.
It converts those current fluctuations into electrical signals that the vehicle’s control systems can read and act on.
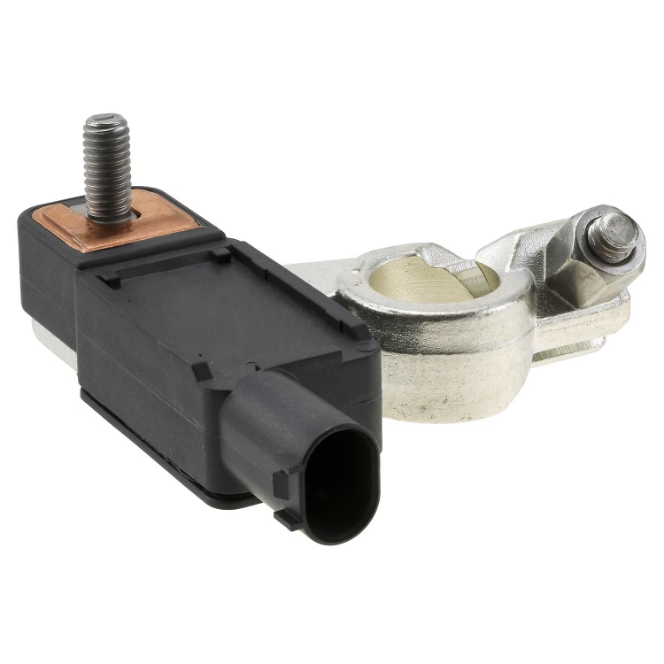
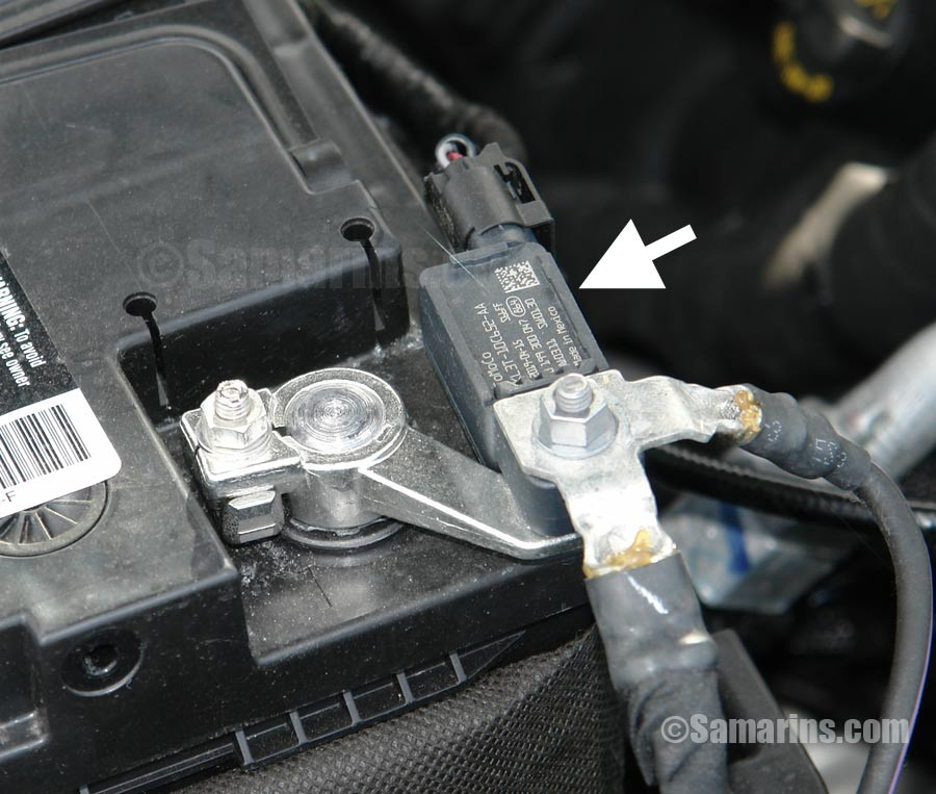
In most modern vehicles, the sensor sits on the negative battery terminal or negative battery cable.
Some designs place it on the positive terminal or integrate it into a battery monitoring module. A few vehicles — particularly those with heavier electrical demands — use sensors on both terminals.
It’s also worth noting that what people call a “battery sensor” isn’t always just a current sensor.
Many modern battery sensors measure current, voltage, and temperature together in a single module, sometimes called an electronic battery sensor (EBS) or intelligent battery sensor (IBS).
For design engineers and component buyers, the battery current sensor is part of a wider family of current sensors used across automotive, battery management, power electronics, and industrial monitoring systems.
What Does a Battery Current Sensor Do?
The battery current sensor has several interconnected jobs. Here’s a quick breakdown:
| Function | What It Does |
| Monitors charge/discharge current | Tracks how much electricity flows in and out of the battery |
| Controls alternator output | Helps the ECU regulate charging voltage and frequency |
| Supports start-stop systems | Confirms the battery has enough charge to restart the engine |
| Prevents overcharging/undercharging | Protects battery chemistry and extends service life |
| Estimates state of charge (SOC) | Tells the system roughly how much charge is left |
| Manages electrical loads | Sheds non-essential loads when battery is low |
| Feeds data to BMS/ECU/BCM/PCM | Provides raw current data for vehicle-wide power decisions |
According to Banner Batterien, battery sensors record voltage, current, and temperature data, which the vehicle control unit uses to calculate state of charge (SOC), state of function (SOF), and state of health (SOH).
Without this sensor, the vehicle’s power management system is essentially flying blind.
Where Is the Battery Current Sensor Located?
In most passenger vehicles, the battery current sensor is clamped onto or integrated into the negative battery terminal.
This placement allows it to measure all current flowing to and from the battery through the main ground path.
Common locations include:
- Negative battery terminal (most common)
- Negative battery cable, a few inches from the terminal
- Positive battery terminal (less common, some European models)
- Battery monitoring module mounted near the battery
- Inside the battery pack or junction box (hybrids and EVs)
One important point: because the sensor sits on the negative terminal, any accessories grounded directly to the negative battery post instead of to a chassis ground can bypass the sensor and cause inaccurate readings.
How Does a Battery Current Sensor Work?
The sensor uses one of three measurement technologies depending on the vehicle design.
LEM identifies Hall effect, fluxgate, and shunt resistor technologies as the primary approaches used in automotive battery current sensing.
Shunt-Based Sensor
A precision low-resistance resistor (the shunt) sits in the current path. When current flows, it creates a small, measurable voltage drop across the shunt.
The sensor’s circuit reads that voltage and converts it into a current value. This method is accurate, reliable, and common in 12V lead-acid battery systems.
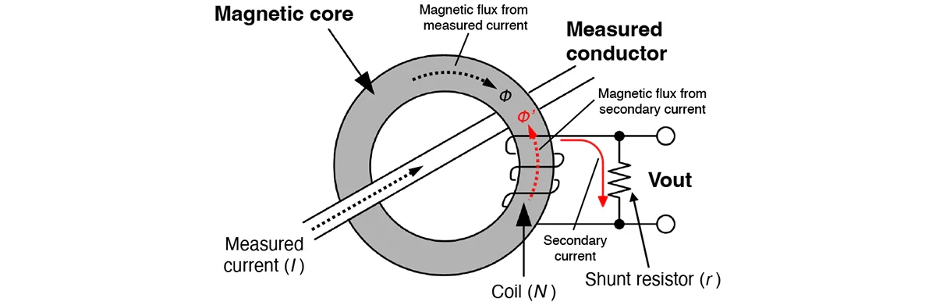
Hall Effect Sensor
A Hall effect sensor measures the magnetic field generated by current flowing through a conductor — without the circuit being broken.
This non-contact approach provides electrical isolation and works well in higher-current systems. It’s common in hybrid and EV battery packs.
The ACS712 Hall effect current sensor is a widely used IC that demonstrates this principle. For higher-current automotive applications, the ACS758 Hall effect current sensor is an open-loop option capable of sensing up to 50A DC.
Fluxgate Current Sensor
A more advanced technology used where precision is critical. Fluxgate sensors are highly accurate and stable.
This makes them suitable for demanding automotive BMS applications where even small measurement errors affect battery health calculations.

What Happens When a Battery Current Sensor Goes Bad?
When this sensor fails, the vehicle receives incorrect or missing current data.
The results range from minor annoyances to complete start failures — depending on how heavily the vehicle relies on battery management.
Battery Warning Light or Check Engine Light
The ECU detects a mismatch between expected and actual sensor readings and logs a fault code. The battery warning light, check engine light, or both may illuminate on the dashboard.
Erratic or Incorrect Charging
The alternator charges based on the signal it receives from the BMS or ECU. A bad current sensor gives the system false data.
This leads to overcharging (which damages the battery) or undercharging (which leaves you with a chronically weak battery).
Start-Stop System Disabled
Start-stop systems depend heavily on battery state readings. If the sensor reports a lower state of charge than what’s actually in the battery, the system will refuse to shut the engine off at idle — or worse, kill the engine without being confident it can restart.
Battery Drains Overnight
A failing sensor doesn’t always cause a direct drain, but inaccurate load management decisions — driven by bad sensor data — can leave the alternator undercharging the battery over time, resulting in a battery that never fully recovers.
Electrical Accessories Cutting Out
When the BMS thinks the battery is running low, it sheds non-essential loads.
Heated seats, infotainment, climate systems, and navigation may turn off unexpectedly if the sensor is feeding inaccurate low-charge readings.
Car Won’t Start
In some vehicles, a completely failed battery current sensor can trigger power management decisions that prevent a normal start.
This is more common in vehicles where the BMS is deeply integrated into the starting and charging system.
Battery Current Sensor Codes and Warning Messages
When the BMS or ECU detects a sensor fault, it stores a diagnostic trouble code and may trigger a dashboard message.
Exact codes vary by manufacturer, but common indicators include:
- Battery sensor circuit fault (open, short, or signal out of range)
- Battery monitoring system fault
- Charging system warning
- Battery saver mode active
- Start-Stop system unavailable
- “Check battery sensor” or “Battery not charging” messages on the instrument cluster
These messages don’t always mean the sensor itself has failed. A corroded connector, loose terminal, or grounding issue can produce identical codes. Always read the full fault description from a scan tool and investigate wiring before condemning the sensor.
Common Causes of Battery Current Sensor Failure
These sensors are generally durable, but they’re exposed to one of the harshest environments under the hood.
Common failure causes include:
- Corrosion around battery terminals or the sensor connector
- Moisture or road salt entering the sensor housing
- Battery acid contamination from leaks or overcharging events
- Loose battery clamps causing intermittent signal loss
- Damaged connector pins or broken wires at the harness
- Physical damage during battery replacement
- Voltage surges from jump-starting or faulty charging equipment
- Accessories incorrectly grounded through the negative post, bypassing the sensor
- Age and heat cycling causing internal component drift over time
Most issues start as intermittent faults before becoming permanent failures which is why catching them early with a scan tool saves time and money.
How to Test a Battery Current Sensor
Testing a battery current sensor doesn’t always require specialist equipment, but it does require a methodical approach.
If you’re new to using a multimeter for vehicle diagnostics, Flywing Tech’s electronic component testing guide covers the basics of voltage, resistance, continuity, and current measurements before you begin automotive troubleshooting.
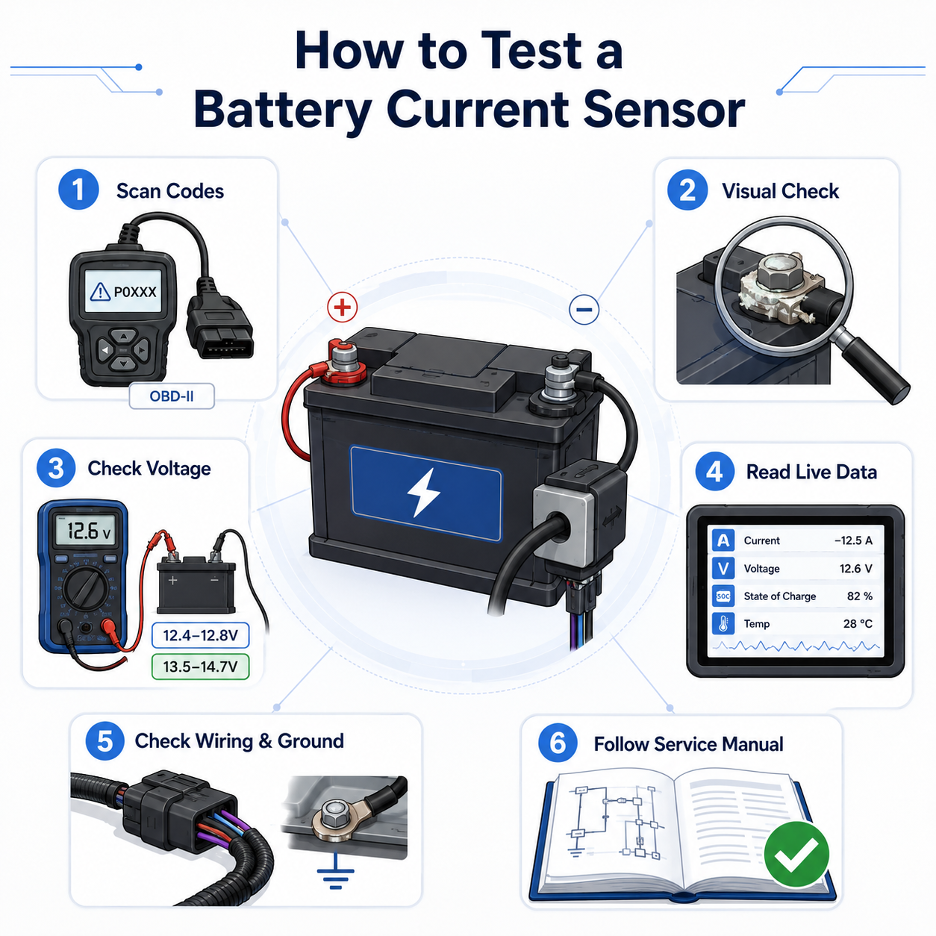
Step 1: Scan for Fault Codes
Connect an OBD-II scanner to the diagnostic port and check for stored or pending codes related to the battery management system, charging system, or current sensor.
Write down any codes before clearing them.
Step 2: Inspect the Sensor Visually
Before reaching for any tools, look at the sensor itself. Check for:
- Cracks in the sensor housing
- Corrosion or white powder on terminals
- Battery acid residue
- Loose or corroded connector pins
- Broken or chafed wires
- A battery terminal that isn’t fully seated
Many sensor faults are caused by corrosion or a loose terminal rather than internal sensor failure.
Step 3: Check Battery Voltage
With the engine off, a healthy 12V battery should read approximately 12.4V to 12.8V. With the engine running, you’d typically expect somewhere between 13.5V to 14.7V, though smart charging systems may vary this intentionally.
Values far outside these ranges point to a charging system issue worth investigating before blaming the sensor.
Step 4: Read Live Sensor Data
A scan tool that supports live data can show you what the sensor is reporting in real time: battery current (amps), battery voltage, state of charge, and battery temperature.
A sensor stuck at 0 amps, or one showing wildly inconsistent values under stable conditions, has likely failed.
Step 5: Check Wiring and Ground Connections
A poor chassis ground or corroded cable can produce symptoms identical to a bad sensor.
Check the main ground strap from the battery negative to the chassis, and any secondary grounds nearby. Clean and tighten as needed before condemning the sensor.
Flywing Tech’s automotive relay tester guide also covers multimeter continuity testing and battery-based circuit checks.
Step 6: Follow Your Vehicle’s Service Procedure
Some manufacturers require resistance or voltage checks at the sensor connector using a multimeter, with specific values in the service manual. Others rely entirely on scan tool diagnosis.
Diagnostic procedures vary significantly between makes, so the service manual is the final word.
Battery Current Sensor vs. Alternator Problem
Many symptoms of a bad battery current sensor overlap with alternator failure. Here’s how to tell the difference.
A bad alternator usually produces low or no charging voltage — typically below 13V with the engine running — or fluctuating voltage that causes the battery to steadily discharge.
In most cases, you’d also see a battery warning light, and the battery itself may measure low voltage after driving.
A bad battery current sensor usually keeps the battery and alternator physically working, but causes the BMS to make incorrect decisions based on wrong data.
You might see erratic charging behavior, incorrect SOC readings, start-stop issues, or accessories cutting out even though the battery tests healthy and the alternator output is normal.
The quickest way to separate them: check live alternator output voltage with a multimeter or scan tool.
If charging voltage is in the normal range (13.5V–14.7V) but battery management behavior is wrong, the sensor is the more likely culprit.
How to Reset a Battery Current Sensor
The term “reset” can mean different things depending on the vehicle. In most cases, you’re not resetting the sensor itself — you’re telling the ECU or BMS to relearn the battery’s current parameters.
A reset is typically needed after:
- Replacing the battery
- Replacing the sensor
- Disconnecting or reconnecting the battery
- Repairing battery cables or wiring
- The stop-start system remaining disabled after battery service
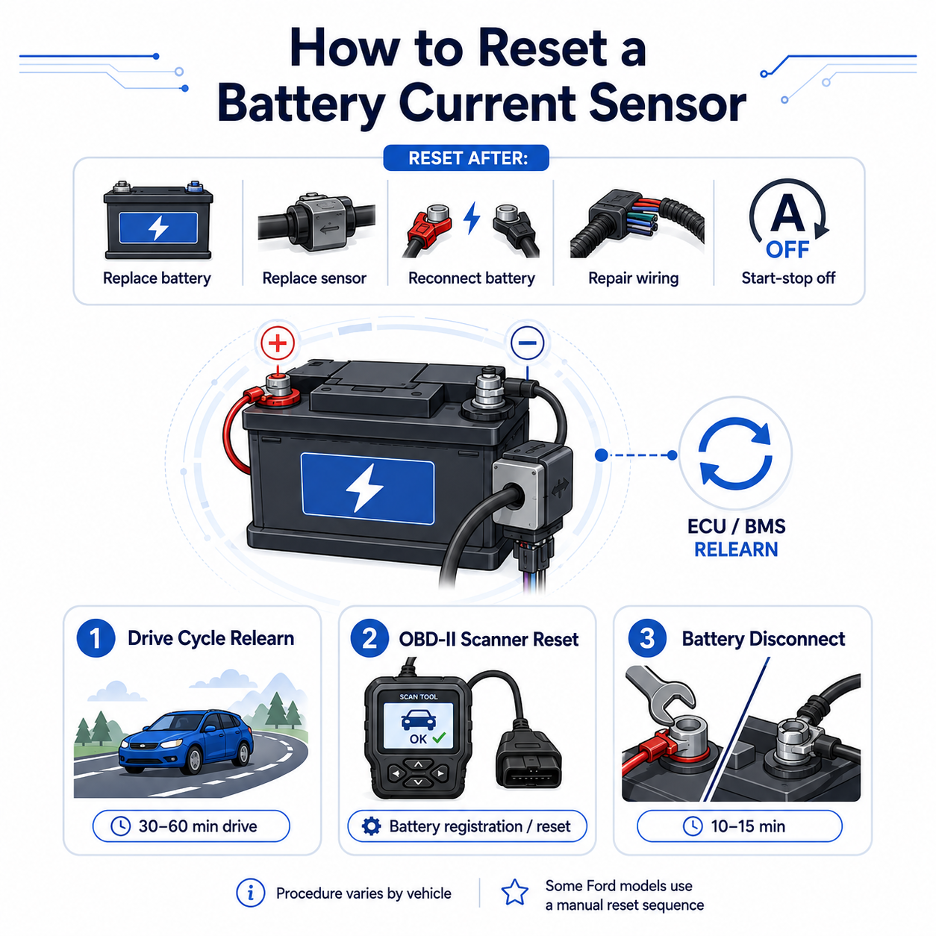
Method 1: Drive Cycle Relearn
Some vehicles automatically relearn battery parameters after a normal drive cycle.
The ECU monitors current flow and adjusts its baseline over 30–60 minutes of driving. The start-stop system may remain inactive during this relearn period.
Method 2: OBD-II Scanner Reset
Many vehicles require a scan tool to initiate a battery sensor reset or battery registration. This is common in BMW, Mercedes-Benz, Audi, Volkswagen, and Ford vehicles.
Without this step, the BMS continues using the old battery’s data — potentially mismanaging the new battery from day one.
For some Ford vehicles, the owner’s manual provides a manual battery sensor reset sequence using the ignition, high-beam flash, and brake pedal — the battery warning lamp flashes three times when the reset is successful.
However, this procedure is vehicle-specific and should not be treated as universal. For other Ford models, a dedicated scan tool or dealer service procedure may still be required.
Method 3: Battery Disconnect
On some simpler systems, disconnecting both battery terminals for 10–15 minutes allows the ECU modules to fully discharge and reset.
This clears stored codes and forces a fresh start. Note that this may also reset radio presets, security codes, and other personalized settings.
Important: Always check your vehicle’s service manual for the correct reset procedure. Using the wrong method on certain vehicles — particularly those with advanced BMS — can cause the system to mismanage charging from the start.
Can You Bypass a Battery Current Sensor?
The short answer: no, not for normal use.
Bypassing a sensor removes the system’s ability to monitor electrical current flowing through the battery.
Without that data, the ECU or BMS cannot manage charging correctly, protect the battery from overcharging or deep discharge, or make informed load-shedding decisions.
The specific risks include:
- Overcharging, which damages battery cells and shortens service life
- Undercharging, leading to repeated starting problems
- Warning lights and fault codes that won’t clear
- Start-stop system permanently disabled
- Electrical accessory malfunctions from poor load management
- Potential battery overheating if charging goes unregulated
In rare diagnostic scenarios, a qualified technician may temporarily bypass or disconnect the sensor to isolate a fault. But this is a workshop procedure and not a fix.
If someone suggests bypassing the sensor as a solution to a battery or charging problem, the actual problem hasn’t been diagnosed yet.
Should You Drive With a Bad Battery Current Sensor?
You may be able to drive short distances with a bad battery current sensor, but it’s not recommended for extended use.
The vehicle may mismanage charging, drain the battery faster than normal, disable the start-stop system, or trigger persistent warning lights. In some vehicles, the BMS will enter a reduced-function mode and limit electrical loads to protect the battery.
The longer you drive with a faulty sensor, the higher the risk of secondary damage — particularly to the battery itself, which may be overcharged, undercharged, or repeatedly deep-cycled based on incorrect data. Diagnose and repair it as soon as possible.
Battery Current Sensor Replacement
If diagnosis confirms the sensor is faulty — and cleaning, wiring checks, and connector repairs haven’t resolved the issue — replacement is the correct path.
When to Replace
Replace the sensor when:
- It is physically cracked or shows acid damage
- The connector or internal circuit has failed permanently
- Scan tool data shows persistent zero output or erratic values
- Fault codes return immediately after clearing
- Visual inspection and wiring repairs haven’t fixed the symptoms
General Replacement Process
- Turn the vehicle off and allow it to sit briefly.
- Consult the service manual for your specific vehicle’s procedure and precautions.
- Disconnect the negative battery terminal first. AutoZone explains that removing the negative terminal first significantly reduces short-circuit risk when working around battery components.
- Unplug the sensor’s wiring connector carefully.
- Remove the sensor from the terminal or cable.
- Install the new sensor, ensuring it seats correctly and terminal contact is clean and tight.
- Route the wiring harness away from heat sources and moving parts.
- Reconnect the battery negative terminal.
- Clear fault codes using an OBD-II scanner.
- Perform a battery registration or BMS relearn if required by the vehicle.
Battery Current Sensor Replacement Cost
Replacement costs vary depending on the vehicle, the sensor type, and whether you go to a dealership or independent shop.
- Part cost: Standalone sensors typically range from around $30 to over $150, depending on brand and vehicle. Integrated cable-and-sensor assemblies can push higher.
- Labor: Shop labor typically runs between $35 and $110, depending on sensor location and access.
- Total estimate: Most simple replacements fall around $100 to $300 including parts and labor. Vehicles with integrated cable assemblies, OEM-only sensors, or required dealership-level battery registration can cost more.
The diagnostic charge — which is often the most time-consuming part of the job — may be billed separately. If the fault turns out to be a corroded connector or a grounding issue rather than a failed sensor, the repair cost can be significantly lower.
Battery Current Sensor vs. Battery Voltage Sensor vs. 12V Temperature Sensor
These terms overlap a lot, and it’s worth knowing the difference.
Battery Current Sensor
Measures electrical current flowing into and out of the battery. This is the primary input for charging management and load control decisions.
Battery Voltage Sensor
Measures the battery’s terminal voltage. It tells the system whether the battery is charged, depleted, or if the charging system output is within normal range.
12V Battery Temperature Sensor
Measures battery temperature. Cold batteries need different charging voltages than warm ones, so the BMS uses temperature data to adjust the charging curve and protect the battery.
For a broader look at how temperature sensors work, see our temperature sensor guide.
Electronic Battery Sensor (EBS / IBS)
Many modern vehicles combine all three functions — current, voltage, and temperature — into a single module, often called an electronic battery sensor or intelligent battery sensor.
Symptoms vs. Other Possible Causes
Many symptoms overlap with alternator, battery, parasitic draw, and ground issues. This table helps narrow things down:
| Symptom | Could Be Sensor? | Could Also Be |
| Battery warning light on | Yes | Alternator fault, loose belt, weak battery |
| Start-stop disabled | Yes | Low SOC, wrong battery type, cold weather |
| Battery drains overnight | Sometimes | Parasitic draw, aging battery, module not sleeping |
| Erratic charging | Yes | Alternator, voltage regulator, ground cable fault |
| No-start | Sometimes | Weak battery, bad starter, poor terminal connection |
Can a Bad Battery Current Sensor Damage the Battery?
Yes — indirectly, but it happens. If the sensor is feeding wrong current data to the BMS, the charging system may overcharge or undercharge the battery on every drive.
Over weeks or months, this wears down battery capacity faster than normal.
A battery that’s consistently overcharged runs hot and loses electrolyte. One that’s repeatedly undercharged sulfates and loses cranking power.
So while the sensor itself doesn’t physically touch the battery cells, bad sensor data can meaningfully shorten battery life.
How to Prevent Battery Current Sensor Problems
A little care goes a long way with these sensors:
- Keep battery terminals clean and free of corrosion — a mix of baking soda and water works well
- Keep the sensor and connector dry; avoid pressure washing around battery electronics
- Secure the battery properly so it doesn’t vibrate or shift and stress the sensor
- Route new accessories to chassis ground points, not directly to the negative battery post
- Use the correct battery type (AGM, EFB, or flooded) specified for your vehicle
- Register or relearn the battery after replacement if your vehicle requires it
- Inspect the sensor visually whenever you service the battery area
Quick Diagnostic Reference
| Symptom | Likely Cause | What to Check |
| Battery warning light on | Sensor fault, alternator issue, weak battery | Scan codes, live data |
| Start-stop system disabled | Low SOC reading or sensor error | Battery state, sensor data, BMS relearn |
| Battery drains overnight | Weak battery, parasitic draw, or bad sensor | Current draw test, sensor output |
| Erratic charging | Wrong current signal to ECU | Alternator output, live sensor data |
| No-start | Weak battery, bad connection, sensor/IBS fault | Battery voltage, terminals, fault codes |
| Fault code returns after clearing | Failed sensor or wiring fault | Connector, ground path, replacement |
| Accessories cutting out unexpectedly | BMS load shedding from false low-charge reading | Sensor data, battery state |
Beyond Automotive: Current Sensing in Other Applications
The same current-sensing principles that protect a 12V car battery apply across a much wider range of applications.
Accurate monitoring is equally important in EV battery packs, solar charge controllers, UPS units, robotics, industrial power supplies, and battery-powered IoT devices.
In each of these systems, a current sensor is what allows the BMS or controller to make safe, efficient charging and load management decisions.
For engineers, repair teams, and component buyers working on battery monitoring, power electronics, or diagnostic equipment, Flywing Tech supplies current sensors, PMIC battery-management components, connectors, sensor cables, and related electronic parts across automotive, industrial, and embedded applications.
You may also find the mass air flow sensor guide andoil pressure sensor guide useful for understanding how other automotive sensors feed ECU data for system control decisions.
Final Thoughts
A battery current sensor may look like a small part, but it plays an important role in modern vehicle power management.
It helps the ECU or BMS understand how much current is entering or leaving the battery, so the vehicle can charge correctly, manage electrical loads, and protect battery life.
If you notice warning lights, start-stop issues, battery drain, or erratic charging, do not replace the sensor immediately.
Start with basic checks such as battery condition, terminal corrosion, wiring, ground connections, and live scan-tool data. Many battery sensor problems are caused by loose connections, corrosion, or incorrect accessory wiring rather than complete sensor failure.
For reliable results, always follow the service manual for testing, reset, and replacement procedures.
This is especially important on vehicles with smart charging systems, AGM or EFB batteries, start-stop technology, or advanced battery management modules.
For related current sensors, connectors, sensor cables, and battery-management components, explore Flywing Tech’s electronic components catalog for automotive, industrial, and embedded power-system projects.
Frequently Asked Questions
What happens when a battery current sensor goes bad?
A bad battery current sensor can send incorrect current data to the vehicle’s ECU or BMS. This may cause warning lights, erratic charging, start-stop failure, battery drain, accessories cutting out, or in some cases, a no-start condition.
How do you test a battery current sensor?
Start with a visual inspection for corrosion, cracks, loose terminals, and damaged wiring. Then scan for fault codes, check battery voltage, and use live scan-tool data to compare current, voltage, state of charge, and temperature readings.
How do you reset a battery current sensor?
Reset methods vary by vehicle. Some systems relearn automatically after a drive cycle, while others need an OBD-II scanner for battery registration or BMS relearn. Some Ford models also support a manual reset sequence, but the service manual should always be checked first.
Can you bypass a battery current sensor?
No, not for normal vehicle use. Bypassing the sensor prevents the BMS from reading battery current correctly, which can lead to charging problems, warning lights, start-stop failure, and reduced battery life.
How much does battery current sensor replacement cost?
A typical sensor replacement often costs around $100 to $300, including parts and labor. Costs can be higher if the sensor is built into the battery cable assembly or if dealer-level registration is required.
Where is the battery current sensor located?
In most vehicles, it is attached to the negative battery terminal or integrated into the negative battery cable. Some vehicles place it on the positive terminal, near the battery, or inside the battery pack in hybrid and EV systems.
Can a bad battery current sensor cause a car not to start?
Yes, in some vehicles. A failed or disconnected sensor can affect power management and starting logic, especially when the battery management system is closely linked to the starter and charging system.
Should you drive with a bad battery current sensor?
Short trips may be possible, but long-term driving is not recommended. The vehicle may mismanage charging, drain the battery, disable start-stop, or limit electrical loads.
Is a battery current sensor the same as a battery sensor?
Not always. A sensor specifically measures current flow. A battery sensor is a broader term and may include current, voltage, and temperature sensing in one module.

COMMENTS