Introduction
Arduino is one of the most beginner-friendly microcontroller platforms used to build electronics projects of all kinds. If you’re working on a compact setup using an Arduino boards, choosing the right microcontroller can make a big difference.
Whether you’re designing with a compact Arduino board or experimenting with a breadboard power board, options like the Nano, Micro, and Pro Mini offer great flexibility.
The Arduino Nano, Micro, and Pro Mini are among the most popular compact options. Although they might look similar at first glance, each board has its own strengths in terms of size, power usage, connectivity, and I/O availability.
In this guide, we’ll explore how these boards compare, what kind of projects they’re best suited for, and how to choose the right one based on your specific requirements.
Board Specifications and Hardware Profiles
All three Arduino boards fall under the umbrella of compact Arduino microcontroller boards. While they share similar processors, each one brings specific strengths to your project.

Arduino Nano is one of the smallest classic Arduino boards, but it is packed with the essential components for many projects.
Here are some key features:
- Microcontroller: ATmega328P
- Operating Voltage: 5V
- Digital I/O Pins: 22
- Analog Input Pins: 8
- Flash Memory: 32 KB
- Clock Speed: 16 MHz
- Physical Size: 18 x 45 mm
- Mounting Holes: No
Nano is ideal for breadboard projects and projects with limited space. Since the pin layout of the boards is identical to that of an Arduino Uno, it is easy to migrate between them.
What makes the Nano popular is how easy it is to get started. It has a Mini USB port and an FTDI chip for straightforward programming. Fruthermore, I/O is sufficient for most beginner and intermediate projects, and it is breadboard-friendly.
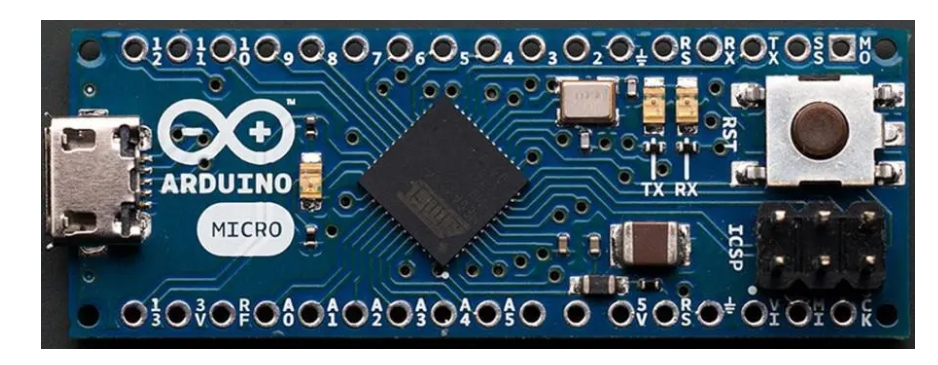
Arduino Micro
The Arduino Micro is smaller than the Nano but has a more powerful processor and networking capabilities. Key features include:
- Microcontroller: ATmega32U4
- Operating Voltage: 5V
- Digital I/O Pins: 20
- Analog Input Pins: 12
- Flash Memory: 32 KB
- Clock Speed:16 MHz
- Physical Size: 18 x 33 mm
- Mounting Holes: Yes
The Arduino Micro is powered by the ATmega32U4 chip, which offers built-in USB support. That means it can act as a keyboard, mouse, joystick, or even a MIDI controller with no extra hardware needed.
While it’s slightly longer than the Nano, it’s still small enough for compact builds. You get 20 digital I/O pins (7 of them PWM) and 12 analog inputs. This makes it a solid choice for more complex projects that need extra connectivity.
It connects via a Micro USB port and works especially well for custom USB devices or applications that require more I/O than the Nano offers.

Arduino Pro Mini
The Arduino Pro Mini is built for simplicity. It uses the same ATmega328P chip as the Nano but removes the USB interface and pre-soldered headers.
This keeps the board compact and lightweight, making it ideal for low-power applications. It’s available in two versions: 5V running at 16 MHz and 3.3V running at 8 MHz.
Here are some key features:
- Microcontroller: ATmega328P *
- Board Power Supply:35 -12 V (3.3V model) or 5 – 12 V (5V model)
- Circuit Operating Voltage:3V or 5V (depending on model)
- Digital I/O Pins:14
- PWM Pins: 6
- UART: 1
- SPI: 1
- I2C: 1
- Analog Input Pins: 6
- External Interrupts:2
- DC Current per I/O Pin:40 mA
- SRAM: 2 KB *
- EEPROM: 1 KB *
- Clock Speed: 8 MHz (3.3V versions) or 16 MHz (5V versions)
Because of its small footprint and lightweight design, the Pro Mini is ideal for battery-powered applications, wearable devices, and embedded systems.
You’ll need an external FTDI programmer to upload code, but the trade-off is a low-power, compact board that can be embedded into tight spaces or custom PCBs.
You can find Arduino Pro Mini 328 boards and compatible accessories at Fly-Wing Technology for reliable performance and fast shipping.
Arduino Board Comparison: Specs, Power, and Size
This section compares the Arduino Nano, Arduino Micro, and Arduino Pro Mini side-by-side on core aspects like hardware specs, performance, software compatibility, and ideal use cases.
If you’re trying to decide between boards, this is where the biggest differences become clear.
Hardware Comparison
Microcontroller and Architecture
All three boards are built on 8-bit AVR architecture, but their capabilities differ based on how they handle power and USB communication.
The Nano and Pro Mini are well-suited for general-purpose projects, with the Pro Mini offering a lower-power option for energy-sensitive designs. The Micro sets itself apart with native USB support which makes it a strong choice for projects that involve direct USB interaction or HID functionality.
Input/Output Pin Count
| Arduino Microcontroller | Digital I/O | PWM Pins | Analog Inputs |
| Nano | 14 | 6 | 8 |
| Micro | 20 | 7 | 12 |
| Pro Mini | 14 | 6 | 6 |
The Micro offers the highest number of I/O pins, which is useful when working with multiple sensors or more complex input configurations.
The Nano and Pro Mini provide a sufficient number of pins for most everyday projects. The Pro Mini includes slightly fewer analog inputs, which helps keep its size compact and power usage low.
Memory and Clock Speed
| Arduino Microcontroller | Flash Memory | SRAM | EEPROM | Clock Speed |
| Nano | 32 KB | 2 KB | 1 KB | 16 MHz |
| Micro | 32 KB | 2.5 KB | 1 KB | 16 MHz |
| Pro Mini | 32 KB | 2 KB | 1 KB | 8 MHz (3.3V) / 16 MHz (5V) |
The Micro has slightly more SRAM, which can help with variable-heavy applications. The Pro Mini’s 3.3V version operates at 8 MHz to conserve power. This makes it suitable for battery-powered designs.
Power Requirements
| Arduino Microcontroller | Operating Voltage | Input Voltage Range | USB Type |
| Nano | 5V | 7–12V | Mini-B |
| Micro | 5V | 7–12V | Micro-B |
| Pro Mini | 3.3V or 5V | 3.3–12V | None (FTDI) |
All three can be powered via VIN or a regulated 5V input. The Pro Mini doesn’t include USB, which allows for slimmer designs and lower power draw, but it also means you’ll need an external USB-to-serial adapter to program it.
Physical Dimensions
| Arduino Microcontroller | Size (mm) | Breadboard Friendly | Headers Installed |
| Nano | 45 x 18 | Yes | Usually Yes |
| Micro | 48 x 18 | Yes | Yes |
| Pro Mini | 33 x 18 | Not by default | No (user-soldered) |
The Pro Mini is significantly smaller and lighter. This makes it ideal for embedded installations. Nano and Micro are better for breadboarding and quick prototyping.
Software Comparison
Processor Family and Arduino Core
- Nano: ATmega328Pcore (Arduino AVR Boards)
- Micro: ATmega32U4 core (Leonardo-compatible)
- Pro Mini: ATmega328P core
The Micro requires the Leonardo bootloader and core to support its USB features. Most libraries are compatible across all three boards, but pin mappings and USB-related functions may vary slightly.
Pin Mapping and Library Compatibility
The Nano and Pro Mini share the same pin layout, making them ideal for breadboard-based Arduino microcontroller projects that prioritize portability and reusability.
The Micro uses the ATmega32U4, which has a different pin mapping, so code may need adjustments.
Also, HID-related libraries only work on the Micro.
Cost Comparison
| Arduino Microcontroller | Typical Price (Official) | Clone Price Range |
| Nano | ~$22 | $4–10 |
| Micro | ~$25 | $6–12 |
| Pro Mini | ~$10 | $2–5 |
All three are budget-friendly, with widely available clones under $10. If you’re building in bulk or on a budget, the Pro Mini offers the lowest cost but requires an FTDI adapter for programming.
9-Step Checklist to Select the Right Arduino Board
Before picking a board, use the following checklist to match your technical requirements and constraints with the right option.
Step 1: Define Your Processing Needs
Start by identifying how much processing power your project requires. If you’re handling basic tasks like reading sensors or controlling LEDs, the ATmega328P on the Nano and Pro Mini is more than enough.
For USB-based tasks like keyboard or MIDI emulation, go for the Micro, which uses the ATmega32U4 and offers native USB and more SRAM.
Step 2: Consider the Space You Have
Look at your project’s physical constraints. The Pro Mini is the most space-efficient option if you need something compact and thin for tight spaces or wearables.
The Nano or Micro fits better for breadboard use or classroom projects due to their pre-soldered headers and easier handling.
Step 3: Estimate Your I/O Requirements
Count the number of components (sensors, buttons, motors) you’ll be connecting. The Nano or Pro Mini will work if your project needs only a handful of pins.
However, if you need more connections, especially analog inputs or PWM outputs, the Micro provides more flexibility.
Step 4: Think About Prototyping Convenience
If you’re setting up a test circuit, Arduino boards like the Nano and Micro can be plugged directly into a breadboard power board. This provides quick access to module and sensor power rails and pin headers.
The Pro Mini requires soldering headers or direct wiring, so it’s more suited for finalized designs or custom PCB integration.
Step 5: Match Voltage to Your Components
Check the operating voltage of the sensors and modules you’ll be using. If your parts run on 3.3V, the 3.3V Pro Mini is the safest match. For 5V systems, all three boards can work, but remember that the Pro Mini has different clock speeds depending on voltage.
Step 6: Evaluate Module and Shield Compatibility
The Nano supports many add-ons thanks to its Uno-like pin layout. The Micro is more suited for direct wiring, while the Pro Mini works best when creating a compact or custom solution from scratch.
Step 7: Include Internet Connectivity Options if Needed
If your project involves Wi-Fi or internet connectivity, know that none of these three boards offer it by default. You’ll need to add an external module like the ESP8266. If integrated Wi-Fi is essential, consider using a Nano 33 IoT instead.
If you’re looking for an Arduino board with built-in BLE support, the Arduino Nano 33 BLE Sense offers onboard sensors and wireless functionality out of the box.
Step 8: Add Bluetooth (If Needed)
Add external Bluetooth modules such as the HC-05 or HM-10 when wireless serial communication is required. If your project requires built-in Bluetooth Low Energy (BLE), the Nano 33 BLE is better than any board discussed here.
Step 9: Stay Within Your Project Budget
Finally, consider your cost limits. The Pro Mini is the most budget-friendly but requires an FTDI adapter for programming.
The Nano adds USB support for a few dollars more, while the Micro offers the most features at the highest price point. In your final decision, also include costs for cables, modules, and adapters.
Conclusion
If you’re using an Arduino breadboard power board, the Nano and Micro work great for prototyping. The Pro Mini is ideal when space is tight and power efficiency is key.
The Micro is ideal for USB-based projects like keyboards or MIDI controllers, offering native USB support and more I/O pins. The Pro Mini is best for compact, low-power designs such as wearables or embedded systems, especially when USB is unnecessary.
All three boards are capable and supported within the Arduino ecosystem. You can pick one that fits your size, power, and connectivity needs.
Explore a wide range of Arduino-compatible boards, sensors, and components on Fly-Wing Technology. Whether you’re building a simple prototype or a complex IoT project, you’ll find the right tools to make it a reality.