
Your dashboard oil light flickers on during a normal drive. Does that mean your engine is about to fail? Not always. In many cases, the issue may be a faulty oil pressure sensor, a loose connector, or a wiring fault rather than a serious internal engine problem.
However, an oil pressure warning should never be ignored. Real low oil pressure can damage an engine quickly, so the safest approach is to check the basics first and confirm whether the sensor is giving accurate information.
This guide explains what an oil pressure sensor does, common faulty oil pressure sensor symptoms, where it is located, how to test it, what oil pressure sensor socket you may need, and what to know before replacing it.
TL:DR
- Oil pressure sensor monitors engine oil pressure and sends readings to the dashboard gauge, warning light, or ECU.
- Common bad oil pressure sensor symptoms include flickering oil light, warning light staying on, gauge reading zero, erratic gauge movement, check engine light, or oil leaking around the sensor.
- Do not replace the sensor immediately. First check oil level, wiring, connector condition, and diagnostic trouble codes.
- The sensor is usually located near the oil filter housing, engine block, cylinder head, or main oil gallery.
- Testing should include oil level check, visual inspection, OBD-II scan, multimeter testing, and mechanical oil pressure gauge confirmation.
- Use the correct oil pressure sensor socket because many sensors sit in tight spaces and can crack if removed with the wrong tool.
- Replace the sensor only if it is leaking, damaged, sending incorrect readings, or confirmed faulty while actual oil pressure is normal.
- When installing a new sensor, start threading it by hand, avoid over-tightening, reconnect the plug securely, check oil level, and inspect for leaks.
What Does an Oil Pressure Sensor Do?
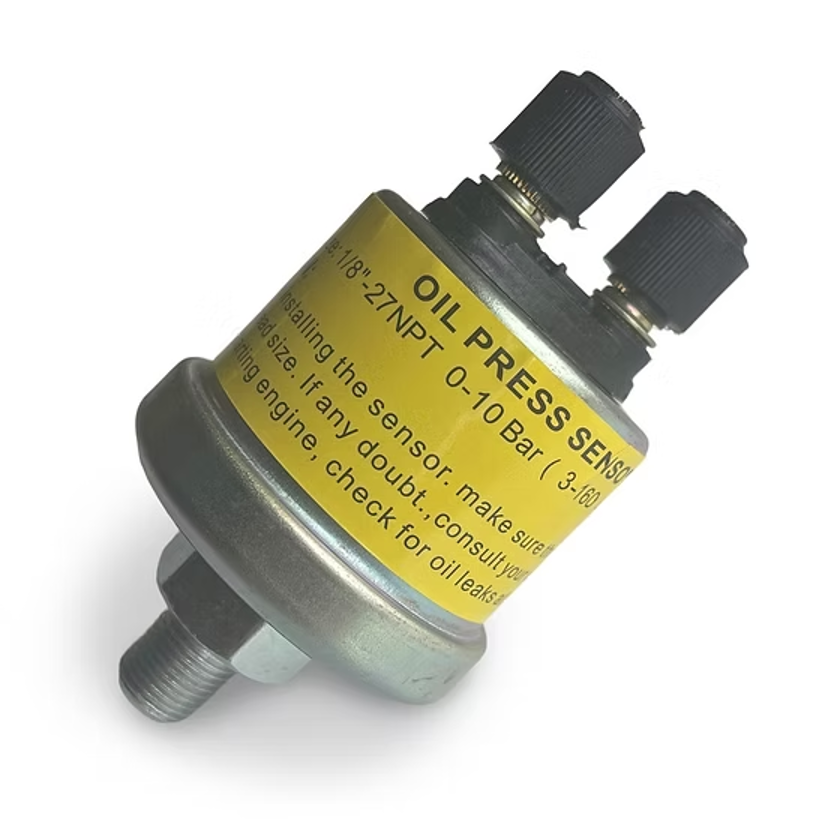
An oil pressure sensor monitors engine oil pressure and sends that information to the dashboard gauge, warning light, or engine control unit. It helps confirm that oil is circulating through the engine with enough pressure to protect moving parts.
Engine oil does more than lubricate. It also helps cool components, reduce friction, support hydraulic systems, and protect bearings, camshafts, lifters, and other internal parts. If oil pressure drops too low, the engine may not receive the lubrication it needs.
The sensor acts as a messenger between the engine’s oiling system and the driver.
When oil pressure is normal, the sensor sends a normal reading. When pressure drops, the sensor alerts the vehicle through a warning light, gauge movement, or ECU fault code.
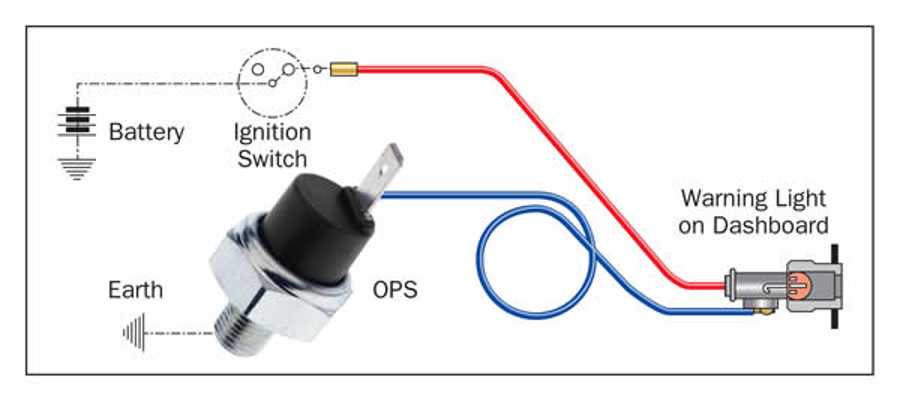
In modern vehicles, the ECU may also use oil pressure information for engine protection strategies. Some engines rely on oil pressure data for systems such as variable valve timing, so a reliable sensor signal is important for both monitoring and performance.

Oil Pressure Sensor vs Oil Sending Unit vs Oil Pressure Switch
An oil pressure sensor, oil sending unit, and oil pressure switch are related parts, but they do not always work the same way.
These terms are often used interchangeably by drivers, mechanics, and parts stores. However, there are useful differences to understand when diagnosing or buying a replacement part.
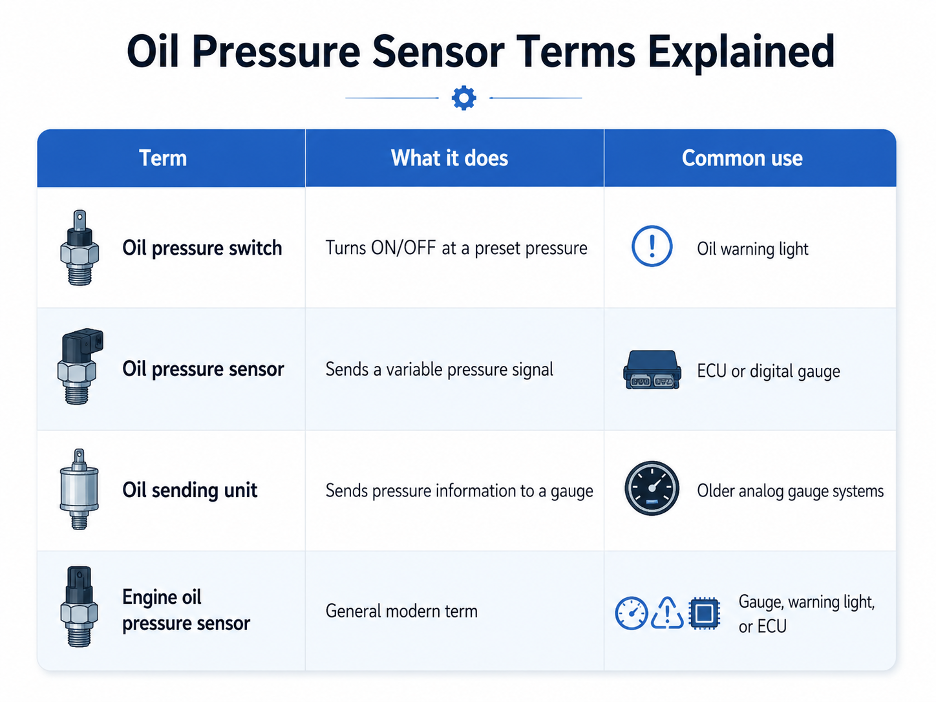
When we talk about oil pressure switch vs oil pressure sensor, An oil pressure switch is usually a simple ON/OFF device. It does not measure a full pressure range. It only changes state when oil pressure falls below a set threshold.
An oil pressure sensor provides a variable signal. This allows the ECU or dashboard gauge to read changing oil pressure more accurately.
An oil sending unit is an older term often used for vehicles with analog oil pressure gauges. It usually refers to a variable resistance device that moves the gauge needle based on pressure.
So, when someone asks, “What is an oil pressure sending unit?” they are often talking about the part that sends oil pressure information to the gauge. In many modern vehicles, that same function is handled by an electronic oil pressure sensor.
Faulty Oil Pressure Sensor Symptoms
Faulty sensor symptoms can look similar to real low oil pressure, which is why proper checking is important.
A bad sensor can trigger warnings even when oil pressure is normal, but real low oil pressure can cause major engine damage.
Common symptoms include:
| Symptom | What it may mean |
| Oil pressure warning light stays on | Bad sensor, low oil, wiring fault, or real low oil pressure |
| Oil light flickers at idle | Weak sensor, loose connector, low oil level, or borderline pressure |
| Oil pressure gauge reads zero | Faulty sensor, broken wire, failed gauge, or no actual pressure |
| Gauge jumps or fluctuates | Sensor signal issue, poor ground, or wiring problem |
| Gauge reads too high | Wrong sensor, signal short, or gauge fault |
| Check engine light appears | Possible oil pressure sensor circuit code |
| Oil leak around sensor | Failed sensor seal, cracked body, or loose threads |
| Oil light on but oil level is fine | Sensor, wiring, or actual pressure issue still needs checking |
Oil Pressure Warning Light Stays On
An oil pressure warning light that stays on can be caused by a faulty sensor, but it can also mean the engine has low oil pressure.
Start by checking the oil level. If the oil level is correct and the engine sounds normal, the sensor or wiring may be the problem. If the engine is noisy, ticking, knocking, or running roughly, turn it off and investigate before driving further.
Oil Light Flickers
An oil light that flickers often points to an intermittent issue. It may happen because of a loose connector, failing sensor, low idle pressure, low oil level, or wiring fault.
If the light flickers mostly at idle and disappears when RPM increases, do not assume it is only a sensor issue. Actual oil pressure can also be lower at idle, especially in worn engines.
Oil Pressure Gauge Reads Zero
A gauge reading of zero while the engine runs smoothly may indicate a sensor or wiring issue. However, zero oil pressure is serious. If the gauge reads zero and the engine makes abnormal noise, switch the engine off immediately.
A mechanical oil pressure gauge can confirm whether the engine actually has pressure.
Gauge Jumps or Fluctuates
An oil pressure gauge that jumps from low to high without a clear reason often points to a bad sensor signal. Real oil pressure usually changes more gradually with engine speed, oil temperature, and load.
Erratic readings can also come from a weak ground, damaged harness, corroded connector, or wrong replacement sensor.
Oil Leak Around the Sensor
Oil leaking from the sensor body usually means the sensor seal has failed. It can also leak from damaged threads, poor sealing, or a loose sensor.
If oil enters the electrical connector, it can also affect the signal and cause warning lights or gauge problems.
Where Is the Oil Pressure Sensor Located?
The sensor is usually located near an engine oil passage, often close to the oil filter housing, engine block, cylinder head, or main oil gallery. Its location depends on the vehicle make, model, engine size, and layout.
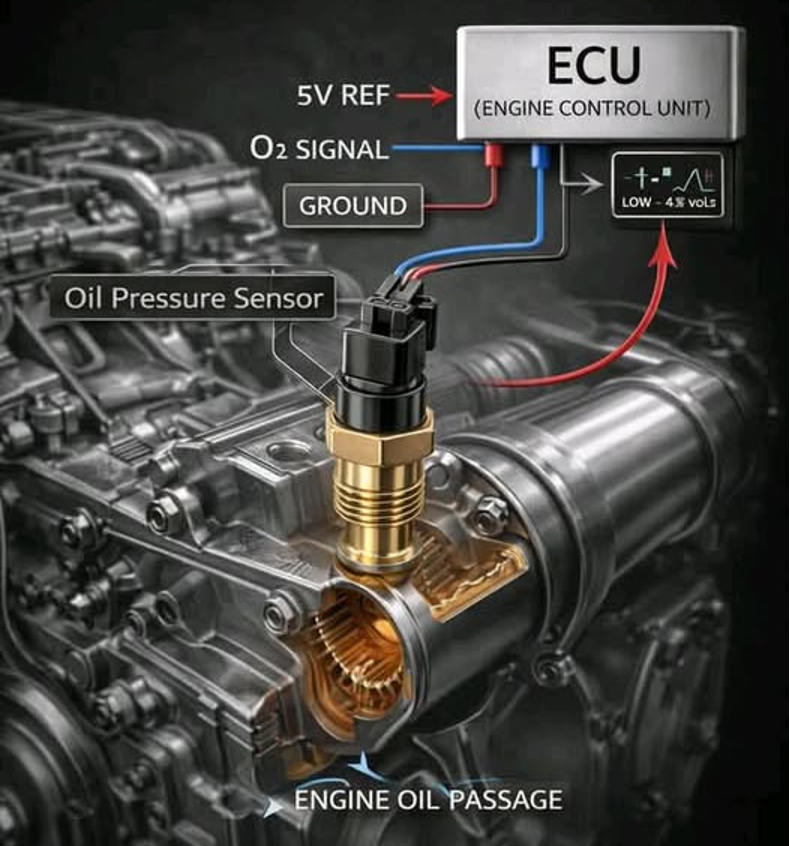
Common locations include:
- Near the oil filter housing
- Threaded into the side of the engine block
- Near the cylinder head
- Close to the main oil gallery
- Behind the intake manifold on some engines
- Near the rear of the engine on some V6 and V8 layouts
- Lower on the engine block in some truck and diesel applications
If you are asking, “Where is the oil pressure sensor located?” the best first places to check are around the oil filter housing and engine block.
Some sensors are easy to access from the top of the engine. Others may require removing an engine cover, intake duct, wheel well liner, alternator, or intake components.
How to Test Oil Pressure Sensor
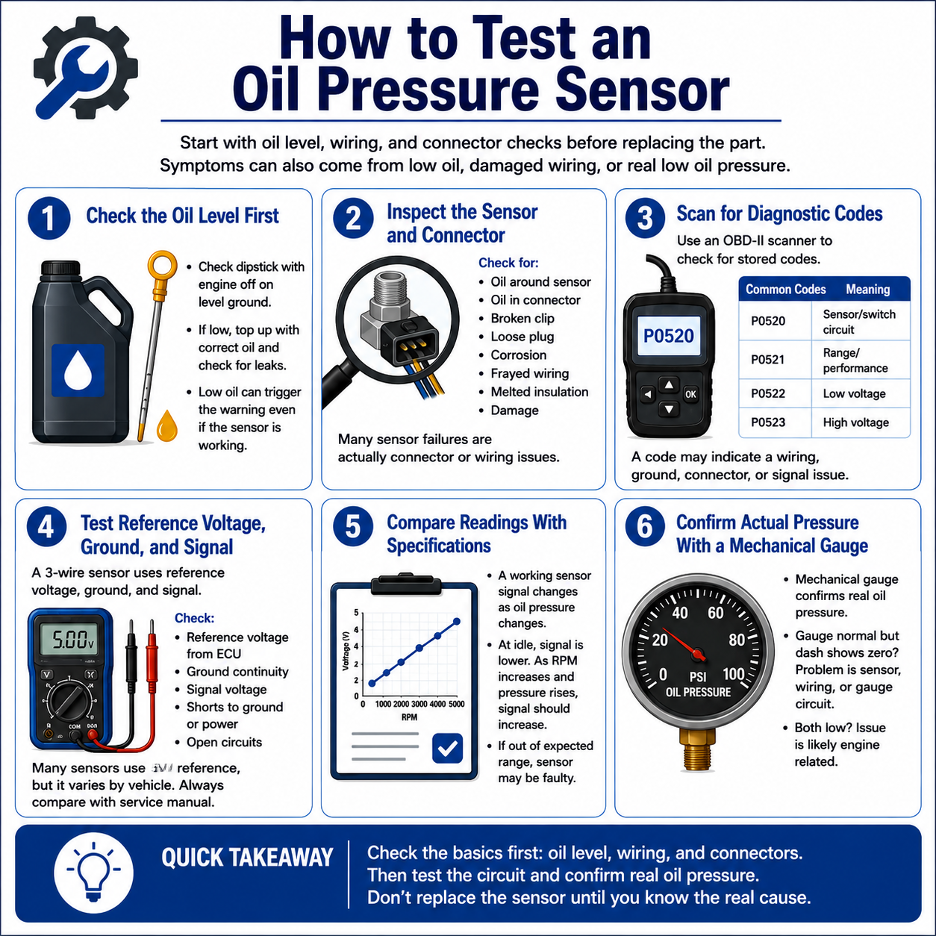
To test, start with oil level, wiring, and connector checks before replacing the part.
The sensor may be bad, but the same symptoms can also come from low oil, damaged wiring, or real low oil pressure.
Step 1: Check the Oil Level First
Check the dipstick with the engine off and the vehicle parked on level ground.
If the oil level is low, top it up with the correct oil grade and inspect for leaks. A low oil level can trigger the oil pressure warning even when the sensor is working correctly.
Step 2: Inspect the Sensor and Connector
Inspect the sensor area before using tools.
Look for:
- Oil around the sensor body
- Oil inside the connector
- Broken connector clip
- Loose plug
- Corrosion on terminals
- Frayed or cracked wiring
- Melted insulation
- Damaged sensor housing
Many suspected failures are actually connector or wiring problems. Cleaning a corroded connector or repairing a damaged wire may fix the issue without replacing the sensor.
Step 3: Scan for Diagnostic Codes
Use an OBD-II scanner to check for stored codes.
Common oil pressure sensor-related codes may include:
| Code | Meaning |
| P0520 | Engine sensor/switch circuit |
| P0521 | Range/performance |
| P0522 | Low voltage |
| P0523 | High voltage |
A code does not automatically mean the sensor itself is bad. It may also indicate a wiring fault, poor ground, connector issue, or signal problem.
Step 4: Test Reference Voltage, Ground, and Signal
A 3-wire oil pressure sensor commonly uses a reference voltage, ground, and signal wire.
With a digital multimeter, you may need to check:
- Reference voltage from the ECU
- Ground continuity
- Signal voltage from the sensor
- Shorts to ground or power
- Open circuits in the harness
Many modern sensors use a 5V reference, but this varies by vehicle. Always compare your readings with the vehicle service manual.
Do not guess wiring by color only. Wire colors can vary across models, trims, and engine versions.
Step 5: Compare Readings With Specifications
A working sensor should produce a signal that changes as oil pressure changes.
At idle, the signal may be lower. As RPM increases and oil pressure rises, the signal should change accordingly. The exact voltage or resistance values depend on the sensor design.
If the sensor signal does not match the expected range, the sensor may be faulty.
Step 6: Confirm Actual Pressure With a Mechanical Gauge
A mechanical oil pressure gauge is the best way to confirm whether the engine has real oil pressure.
If the mechanical gauge shows normal pressure but the dashboard gauge reads zero, the sensor, wiring, or gauge circuit is likely the issue.
If both the mechanical gauge and dashboard show low pressure, the problem may not be the sensor. It could be low oil level, worn bearings, oil pump issues, sludge blockage, wrong oil viscosity, or another internal engine problem.
Oil Pressure Sensor Socket: What Size Do You Need?
An oil pressure sensor socket is often needed because many sensors sit in tight or recessed spaces where a normal wrench cannot grip properly.
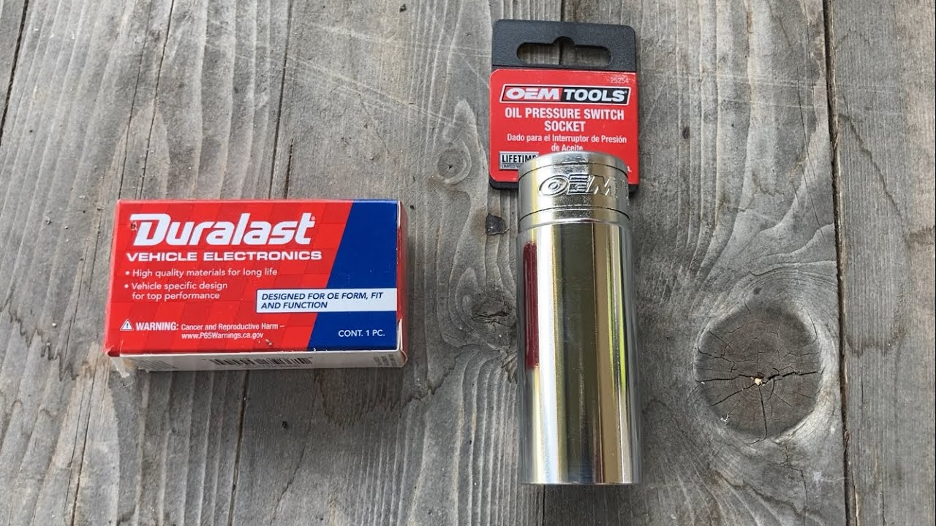
Most oil pressure sensors have a hex section, but the sensor body may be long, fragile, or surrounded by other engine parts. A deep socket allows you to reach the hex without damaging the plastic connector or sensor housing.
Common socket sizes may include:
| Socket size | Common use |
| 1-1/16 inch / 27mm | Common on many vehicles |
| 24mm | Some European and import applications |
| 22mm | Some Japanese vehicles |
| 7/8 inch | Some older applications |
| 1-1/8 inch | Some larger sensors and truck applications |
The exact size depends on your vehicle and sensor design. Always check the replacement sensor, service manual, or parts listing before removal.
Avoid using adjustable wrenches or open-end wrenches if access is poor. They can round the sensor hex, crack the sensor body, or leave the broken sensor stuck in the engine block.
Oil Pressure Sensor Replacement: When Should You Replace It?
Oil pressure sensor replacement is recommended when testing confirms the sensor is faulty, leaking, damaged, or sending incorrect readings while actual oil pressure is normal.
You should consider replacing when:
- Oil leaks from the sensor body
- The connector or sensor pins are damaged
- The sensor signal is outside specification
- Gauge readings remain unstable after wiring checks
- Oil pressure warning stays on but actual pressure is normal
- Oil pressure sensor codes return after inspection
- The sensor housing is cracked or corroded
- The sensor is difficult to access and nearby engine work is already being done
Do not replace the sensor only because the oil light came on. Check the oil level, inspect for leaks, scan for codes, and verify actual oil pressure where possible.
A new sensor will not fix a real low oil pressure problem.
How to Replace Oil Pressure Sensor
To replace, locate the sensor, disconnect the connector, remove it with the correct socket, install the new sensor carefully, and check for leaks after starting the engine.
The exact process varies by vehicle, but the general steps are similar.
Tools and Materials You May Need
- Correct replacement oil pressure sensor
- Correct size deep oil pressure sensor socket
- Ratchet and extensions
- Wobble extension or universal joint, if access is tight
- Thread sealant, if required
- Shop rags
- Small drain pan
- Safety glasses
- OBD-II scanner, if codes need clearing
Step-by-Step Replacement Process
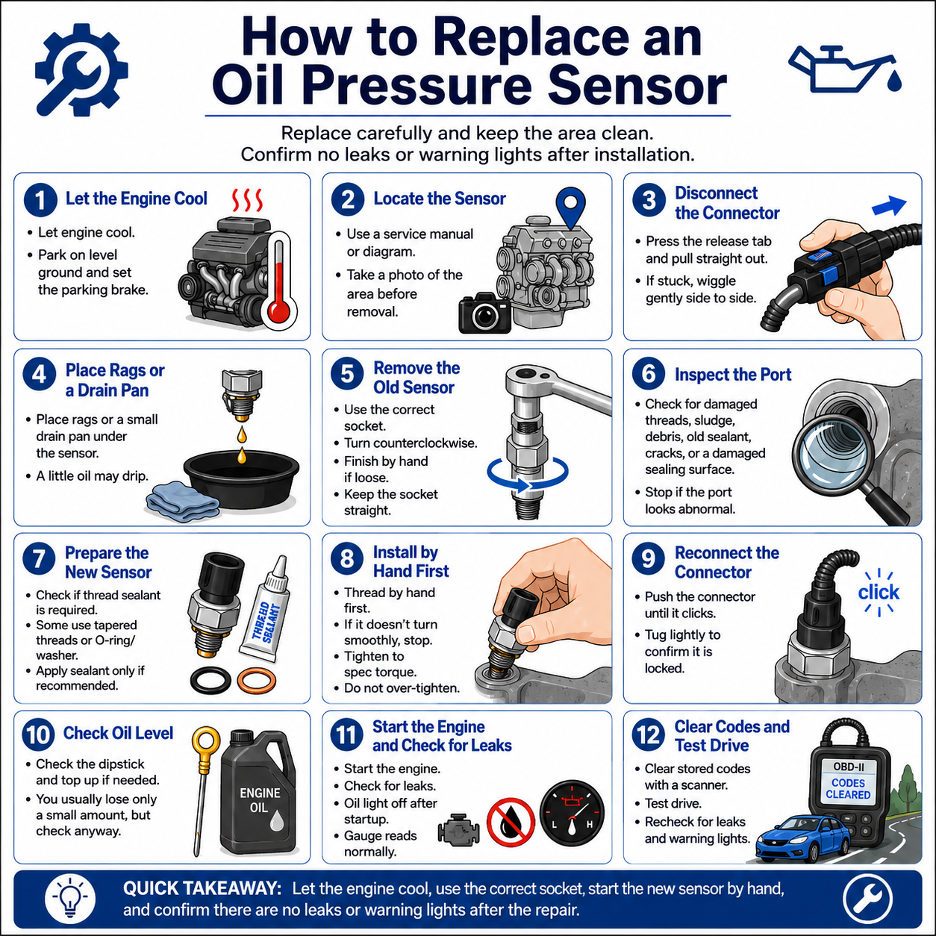
1. Let the Engine Cool
Let the engine cool before working near the sensor. Hot oil and hot engine components can cause burns.
Park the vehicle on level ground and engage the parking brake.
2. Locate the Sensor
Find the sensor using a service manual or model-specific diagram. Take a quick photo before removing anything so you can confirm connector routing and nearby component positions later.
3. Disconnect the Electrical Connector
Press the release tab and pull the connector from the sensor body. Do not pull on the wires.
If the connector is stuck, move it gently from side to side while pulling on the connector housing.
4. Place Rags or a Drain Pan Under the Sensor
A small amount of oil may drip when the sensor is removed. Use rags or a small drain pan to keep the area clean.
5. Remove the Old Sensor
Use the correct oil pressure sensor socket and turn the sensor counterclockwise.
Once loose, you may be able to remove it by hand. Keep the socket straight to avoid damaging the threads or sensor body.
6. Inspect the Port
After removal, inspect the threaded port.
Check for:
- Damaged threads
- Sludge buildup
- Debris
- Old sealant
- Cracks around the port
- Damaged sealing surface
If the threads are damaged or the port looks abnormal, stop and get professional advice before installing the new sensor.
7. Prepare the New Sensor
Check whether the new sensor requires thread sealant.
Some sensors use tapered threads and may need a small amount of sealant. Others use an O-ring, crush washer, or pre-applied sealant and should not receive extra sealant.
Apply sealant only if recommended. Keep sealant away from the sensor tip and oil passage.
8. Install the New Sensor by Hand First
Start threading the new sensor by hand. If it does not turn smoothly, stop. Cross-threading can damage the engine block or housing.
Once hand-tight, use the socket to snug it down to the correct torque specification. Do not over-tighten.
9. Reconnect the Connector
Push the connector onto the new sensor until it clicks. Give it a light tug to confirm it is locked in place.
10. Check Oil Level
Check the dipstick and top up the oil if needed. You usually lose only a small amount, but it is still worth checking.
11. Start the Engine and Check for Leaks
Start the engine and inspect the sensor area immediately.
Check that:
- No oil leaks around the sensor
- The oil light turns off after startup
- The gauge shows a normal reading, if equipped
- No warning returns after a short idle
12. Clear Codes and Test Drive
If diagnostic codes were stored, clear them with a scanner and take a short test drive. Recheck for leaks and confirm the warning does not return.
How to Choose the Right Engine Oil Pressure Sensor
The right sensor must match the vehicle, connector, thread size, pressure range, and signal type. Do not choose a replacement sensor only by appearance.
Two sensors can look almost identical but have different internal calibration, output signals, or thread designs.
Before buying, check:
| Factor | Why it matters |
| Vehicle make, model, year, and engine | Confirms correct fitment |
| VIN or engine code | Helps avoid trim or mid-year differences |
| Connector type | Must match the wiring harness |
| Pin count | Must match the vehicle circuit |
| Thread size and pitch | Must fit the engine port |
| Sensor vs switch type | Must match the vehicle system |
| Pressure range | Must match gauge/ECU expectations |
| Output signal | Must match the electrical system |
| Seal type | Affects installation and leak prevention |
| Temperature rating | Must handle engine heat and oil temperature |
OEM vs Aftermarket Oil Pressure Sensors
OEM sensors are designed to match factory specifications. They usually cost more but reduce compatibility risk.
Quality aftermarket sensors can also work well when they are made by reputable brands and matched correctly to the vehicle. Avoid very cheap no-name sensors where the connector, calibration, or sealing quality may be questionable.
For best results, use VIN-specific fitment where possible. This helps avoid mistakes caused by engine variations, production changes, or regional differences.
Oil Pressure Sensor vs Oil Level Sensor
An oil pressure sensor is not the same as an oil level sensor. They measure different things.
| Part | What it measures |
| Oil pressure sensor | Pressure in the lubrication system |
| Oil level sensor | Amount of oil in the oil pan/sump |
| Oil temperature sensor | Temperature of the engine oil |
A vehicle can have enough oil level but still have low oil pressure. This can happen because of oil pump wear, bearing wear, sludge blockage, wrong oil viscosity, internal leakage, or a clogged pickup screen.
That is why checking oil level is only the first step. It does not prove that oil pressure is normal.
Final Thoughts
An oil pressure sensor is a small part, but it plays an important role in engine protection. When it fails, the symptoms can look serious: warning lights, strange gauge readings, fault codes, or oil leaks around the sensor.
The right approach is to diagnose before replacing. Check the oil level, inspect the connector, scan for codes, test the circuit, and confirm actual oil pressure if needed. If the sensor is leaking, damaged, or sending incorrect readings while real pressure is normal, replacement is usually the right fix.
For electronics projects, diagnostics, and pressure-sensing prototypes, Flywing Tech offers a wide range of pressure sensors and transducers, including analog, digital, absolute, and gauge pressure options.
Most importantly, never ignore an oil pressure warning. A faulty sensor is often a manageable repair, but real low oil pressure can cause severe engine damage. Proper testing helps you tell the difference and make the right repair decision.
Frequently Asked Questions About Oil Pressure Sensors
What does an oil pressure sensor do?
An oil pressure sensor monitors engine oil pressure and sends that information to the dashboard gauge, warning light, or ECU. It helps warn the driver if oil pressure drops too low and the engine may not be receiving proper lubrication.
What are faulty oil pressure sensor symptoms?
Faulty oil pressure sensor symptoms include an oil warning light that stays on, flickering oil light, gauge reading zero, erratic gauge movement, check engine light, oil pressure sensor codes, or oil leaking around the sensor body.
Where is the oil pressure sensor located?
The oil pressure sensor is usually located near the oil filter housing, on the engine block, near the cylinder head, or close to the main oil gallery. The exact location depends on the vehicle make, model, and engine layout.
How do you test an oil pressure sensor?
You test an oil pressure sensor by checking oil level, inspecting the connector and wiring, scanning for codes, testing reference voltage, ground, and signal with a multimeter, and confirming actual pressure with a mechanical oil pressure gauge if needed.
How do you replace an oil pressure sensor?
You replace an oil pressure sensor by letting the engine cool, disconnecting the electrical connector, removing the old sensor with the correct deep socket, installing the new sensor carefully, reconnecting the plug, checking oil level, and inspecting for leaks after startup.
What size oil pressure sensor socket do I need?
The oil pressure sensor socket size depends on the vehicle and sensor. Common sizes include 1-1/16 inch, 27mm, 24mm, 22mm, 7/8 inch, and 1-1/8 inch. Always confirm the correct size before removal.
Is an oil pressure sensor the same as an oil sending unit?
An oil pressure sensor and oil sending unit are often used interchangeably, especially when the part sends pressure information to a gauge. However, an oil pressure switch is different because it usually provides only an ON/OFF warning signal.
Can a bad oil pressure sensor cause the oil light to come on?
Yes, a bad oil pressure sensor can cause the oil light to come on even when actual oil pressure is normal. However, you should always check oil level and confirm pressure because real low oil pressure can damage the engine.
Can you drive with a faulty oil pressure sensor?
You should avoid driving with an unconfirmed oil pressure warning. If testing confirms the sensor is faulty and actual oil pressure is normal, the vehicle may still run, but you lose an important warning system. Replace the faulty sensor as soon as possible.


COMMENTS